Condition Assessment Assignment Task Guide
This manual will guide users through the Condition Assessment Task and Assignment Set Up and Completion Process.

Creating a "Task" will provide the template for an "Assignment", users must create a "Task" first, then generate an "Assignment" to be completes.
What is a Condition Assessment Task and a Condition Assessment Assignment
Condition Assessment Task is a template for generating a Condition Assessment Assignment. The "Task" is set up with a Name, Technology Type, Start Date, Interval, Assigned User, and a
List of Points (or locations) that need to be assessed. Once a "Task" is created, a "Condition Assessment Assignment" can be generated from the "Task". Task
Assignments may be manually or automatically generated.
The Condition Assessment Assignment (or CAA) is designed to assist users with completing a condition monitoring inspection task. Allowing the user to assess the condition and assign
a state to a location. The normal assignment allows user to assign a state of "
Measured - No Problem",
"
Measured - Condition Comment", "
Measured - Condition Entry", or
"
Not Measured".
The measurement state are Configurable by database, more options are available upon request of your Tango Administrator.
Contact Us to learn more.
The Condition Assessment Assignment Report is generated from a completed Assignment, which both summarizes and details the collected data into a printable/emailable report.
Learn more about
CAA Reports.
CAA Tasks help customers in a number of ways;
- Centralized control panel for all condition monitoring activities makes it easy to see what’s coming up, what’s overdue, and who is accountable.
- Email notifications of upcoming condition tasks keep managers and technicians informed.
- Assessment process saves condition monitoring technician's time when documenting their results.
- Provides managers with an audit trail; proving monitoring is completed on time and consistently.
Creating / Setting Up / Editing a Task
To begin setting up a task, navigate to the location tree structure on the left of the user interface.
1) Click "Services" to drop down the services menu.
2) Click "Condition Assessment Services"
3) Click the icon

next to "Condition Assessment Task Control Panel". This will display the CAA Control Panel in
the main view window.
4) To set up a task, user will need to click on the "Task Definitions & Location Selection" tab.
5) Add a new task or edit a current task.
- Click "Add New" to create a new task.
- Click the Drop Down option button next to a current task that needs to be edited.
- A pop-up window will be displayed with the Task information.
If you are not able to see the pop-up window, be sure your browser settings allow TF7.com to display pop-up menus. Users may have to contact their IT department to allow this setting to change.
6) To complete the set-up, users need to fill out the following fields:
- A) Task Name: Name the task - usually contains the duration, technology type, and unique name description. * Required
- B) Technology: Choose the type of technology the route will monitor, technologies are predetermined by the database set up. * Required
- C) Next Due To Start Date: Set for the next date the task should be started. * Required
- D) Interval: Set how many days are intended between starting dates of the task. (eg. 365 days for yearly task) * Required
- E) Assigned User: Set the responsibility for who should complete the task assignment. * Required
- F) Days to Complete: Set the expected number of days in which the task should be completed after start, in order to auto-calculate an expected finish date. * Note
- G) Plant Notification Email: Set e-mail addresses that will receive notification emails when a task assignment is Auto-Generated. ** Note
- H) Task Group Name: Provide a task a group name to allow for better task filtering. To work properly, the name must be spelled exactly the same when applied to other task you want to associate in the group.
- I) Is Active: Check this box to enable the task to be assigned to a user, through either manual or auto-generated assignment.* Required
- J) Alias Type Associated with Locations: Setting an alias type will display that alias type value when selecting locations; which can be sorted for easier location selection.
- K) Setup for Hand-Held Route: Enables a task, once the assignment is created, to be available to run as a Roundslogging route.
* Required = Required for all Tasks
* Required = Required for Auto-Assign Assignments of Tasks (see
Auto-Assign vs. Manual Task Assignment)
* Note = Not required, but will override the Interval days when creating an Auto-Assign Task Assignment.
** Note = Manually created task assignments will not use these addresses to send notification emails.
7) Click "Save".
This will create the task, but requires further actions to create Assignments. Users must add locations (move to
Assign Locations to a Task section),
create assignment (move to
Creating an Assignment section).
Assign Locations to a Task
There are two methods to assign Locations to a Task.
Set locations from the Condition Assessment Control Panel:
Use if the locations are spread throughout the database.
Instructions for this option
Selecting locations from the Condition Assessment Control Panel will display every available component in the database and can cause lag or timeouts for larger databases. If this happens, try running assign locations from the tree.
Set locations from a Parent location in the Asset Tree:
Use if the locations are under a parent location in the database. (All selectable locations are under a specific function level.)
Instructions for this option
Set Locations from Condition Assessment Control Panel
1) Open the "Condition Assessment Task Control Panel".
2) Click on the "Task Definitions & Location Selection" Tab.
3) Click the menu button next to the desired task and select "Edit Task Locations"
4) All location will be displayed in the main window.
Skip next section, finish location assignment
Set Locations from a Parent location in the Asset Tree
1) Find the parent location in the asset tree that contains all the children locations that need to be added to the task.
Only asset components can be added to a task, but users can filter by a Unit, Function, or Asset location.
2) Click the menu button next to the desired location.
3) Click "Other Reports", Click "Select Locations for Condition Assessment Task".
4) Users will see the task locations in the main window. Click the drop down menu next to the task that needs assigned locations.
Continued Assign Locations to a Task
The location selection screen has multiple functions and options to choose from:
A)
Filtered By: If the user choose to filter by the asset tree, a blue "Filtered by Selected Location" box will be visible, if more points in other
locations are needed, click the "X" on the left of the blue box to remove this filter.
If the task already exist with locations and the user is editing/adding locations, only the location that were previously selected will be displayed. Click the "All" button to see all the points under that location.
B)
Locations Displayed: Two tabs allow for users to toggle between all available points or all selected point (useful if a user needs to deselect locations or see what is on the task currently).
C)
Location Filter by Keyword, Sort Order, and Select/Deselect All:
- Clicking the drop down arrow on the "Selected" box will display options for check boxes: select all, deselect all, ascend checked, descend checked.
- Users can type keywords to search for locations in one or multiple hierarchy locations text fields. To remove the filter, delete the text from the text box.
- Clicking the hierarchy level name will toggle between ascending and descending.
- Clicking the drop down arrow on the far right on the hierarchy level name will display clickable options for sorting or clearing filters.
D)
Selection Boxes: Check or uncheck all the check boxes next to the locations that needs to be added to or removed from the task.
5) Click Save.
Auto-Generated vs. User Select Assignments
Condition Assessment Assignments can be created in two ways, User Generated Assignments and Auto-Generated Assignments.
User Select Assignments
User Select Assignments are simple; users generate the assignment from the "Create Assignment" Tab in the "Condition Assessment Task Control Panel".
1) Open the "Condition Assessment Task Control Panel".
2) Click on the "Create Assignment" Tab.
3) Check the check box next to the task.
4) Click "Create Assignment".
5) Fill in the Assigned User and Expected Finished Date.
6) Click "Create".
The Assignment will now be accessible from the "Open Assignments" Tab in the Control Panel.
Auto-generated Assignments
Auto-generated assignments are automatically created by Tango if four (4) critia are met:
- Current "Next Due Date" is set by the user OR
Previous "Completed Assignment Date" exists
- "Plant Notification Email Lead Time" OR
"Analyst Reminder Email Lead Time"
Note:large number of days is used if both fields are populated.
- "Interval" (in days)
- "Assigned User"
If the current "Next Due Date" is not set, or the "Interval" in days is not set or is zero, then the new "Next Due Date" is set to nothing and will not be auto-generated.
Tango cannot calculate the "Next Due Date" without both of these values. There must be a "Next Due Date" currently set and there must be an "Interval".
The task must also have a "Assigned User" set, as well, to auto-generate.
If the assignment was completed early or exactly on time (on or before the current "Next Due Date"), and
if the "Completed Assignment Date" and the "Interval" is before the current "Next Due Date", then
the new "Next Due Date" is set to the "Completed Assignment Date" plus the "Interval".
However, if the task is completed after the Current "Next Due Date", the New "Next Due Date" will be auto-generated by the
Current "Next Due Date" plus the "Interval" once the assignment is completed. However, once the assignment is completed past due,
the assignment will need to be completed again before the New "Next Due Date" (assignment must be completed twice in the 30 day interval period).
Tango will keep adding the "Interval" in days to the current "Next Due Date" until the "Next Due Date" that is after the "Completed Assignment Date".
Once the assignment has been auto-generated, it will appear in the "Open Assignments" tab on the Condition Assessment Control Panel.
Expected Finish Date Computation
The Expected Finish Date Computation section on the General Condition Assessment Configuration tab affects the "Expected Finish Date" when creating an assignment.
If the Expected Finish Date is set to User Select, the user has the ability to edit the expected finish date.
If Auto-Generated (changed to Auto-Calculated) is set, the user will not have the ability to manually change the expected finish date.
Completing an Assignment
After the task is created and the assignment is created, the task will be displayed in the "Open Assignment Tab" on the "Condition Assessment Task Control Panel".
The "Open Assignment Tab" offers multiple filters and options.
A)
Filter Text Field: Type any keyword; such as user, date, task name, or technology to filter the open assignment list.
B)
Header Fields: Clicking the blue headers will toggle between ascending and descending by that column.
C)
Task Options: Clicking the drop down menu will give the user the ability to open the task, display a status report, refresh the locations, or delete assignment. (Limited by roles and rights)
D)
Enter Task: Click "Enter/Edit Assignment Data" to begin or continue an assignment
E)
Mobile Icon: This icon is visible when the assignment is set up to be performed by
Roundslogging on a smart device.
Once the assignment is open the assessment screen also has many filters, sorts, and options:
A)
Work Order Number Field: Add a work order number to the task.
B)
To Do Indicator: If the "To Do" is applied, the blue box will be displayed, clicking the x in the box will remove the filter.
C)
Mass Selection Option Button: By clicking this button, users can select all, clear all, remove assessments of all, or assess all points with a single state.
D)
Location Headers: Clicking the header will arrange the locations in ascending or descending order.
E)
Text Filter: This text field allows users to type a keyword to filter the assessment points by that key word or number. Remove the text to remove the filter.
F)
All/To Do Filter: This option allows the user to toggle between "All" points in the assignment or "To Do"(no assessment value has been made) points.
G)
Assignment Option Button: Allows the user to close or delete the assignment.
H)
Point Selection Checkbox: Allows users to click one or multiple points to assign an assessment to.
I)
Location Mass Assessment Option: This option allows user to assign an assessment to all points under that location. If a single point under that location has a value, this option cannot be
used, user must add a mass assessment to the location first then change the assessment of the component location.
J)
Component Assessment Option: Allows the user to add an assessment to that location.
K)
Current State: Displays the current state color and assessment state of the location.
L)
Previous Assessment State Color: Displays the color indicator of the last assessment made.
M)
Previous Assessment History Button: Click this button to see the assessment history of that location.
N)
Condition Entry Viewer Button: Click this button to view the condition entry history (both open and closed) associated with this location.
O)
Previous Assessment State Details: Displays the assessment state of the last assessment made.
One other useful feature of the Condition Assessment Entry screen is the "Pie Charts" on the top right. Once the assignment is open the pie chart will be fully black, this means no measurements
have been made. Once a measurement has been made, the pie will display that state as a slice of the pie. Users can click on any slice of the pie to filter the
measured points in the "Status" column that matches that pie slice. Clicking the X in the "Blue Filter Box" will remove the filter. Also, if the task has been completed in the past, the "Previous Pie"
will display the previous states, clicking a slice of the previous state will display those states in the "Previous Status" column. Again, click the X to remove the filter.
Creating a Reassignment
Reassessment can be made once a Condition Assessment Assignment has been completed and some of the points were not assessed (eg. Not Measured -- Equipment Down, Nothing Measured --Not Accessible, etc.).
This process can be done multiple times until all points have been assessed with a measurement or until a full assignment is created.
To create a Reassessment Assignment:
1) Open the "Condition Assessment Task Control Panel".
2) Click on the "Create Assignment" Tab.
3) Check the check box next to the task under the Reassess column.
Be sure not to check the checkbox under the Assess Task or a full assignment will be created instead of a reassessment task.
4) After the assignment is created, the assignment will be available on the "Open Assignment" tab, but only the points that were not assessed on the previous assignment.
5) Once the assignment is completed, a "Condition Assessment Assignment Report" will be available under the "Condition Assessment Report Search", but the report will only
display those points that were reassessed, not all the original points on the task.
Set a Task To Be Completed From Tango™ Roundslogging
An assignment can be created to allow users to collect data from a Mobile Device using Roundslogging. To do this, there are a few steps that must be completed.
1) From the
Task Creation Screen, before the assignment is created, the "Setup for Hand-Held Route" option must be checked.
2) Selecting loctions and setting the order.
Before the assignment can run on a mobile device, an order must be assigned to all locations.
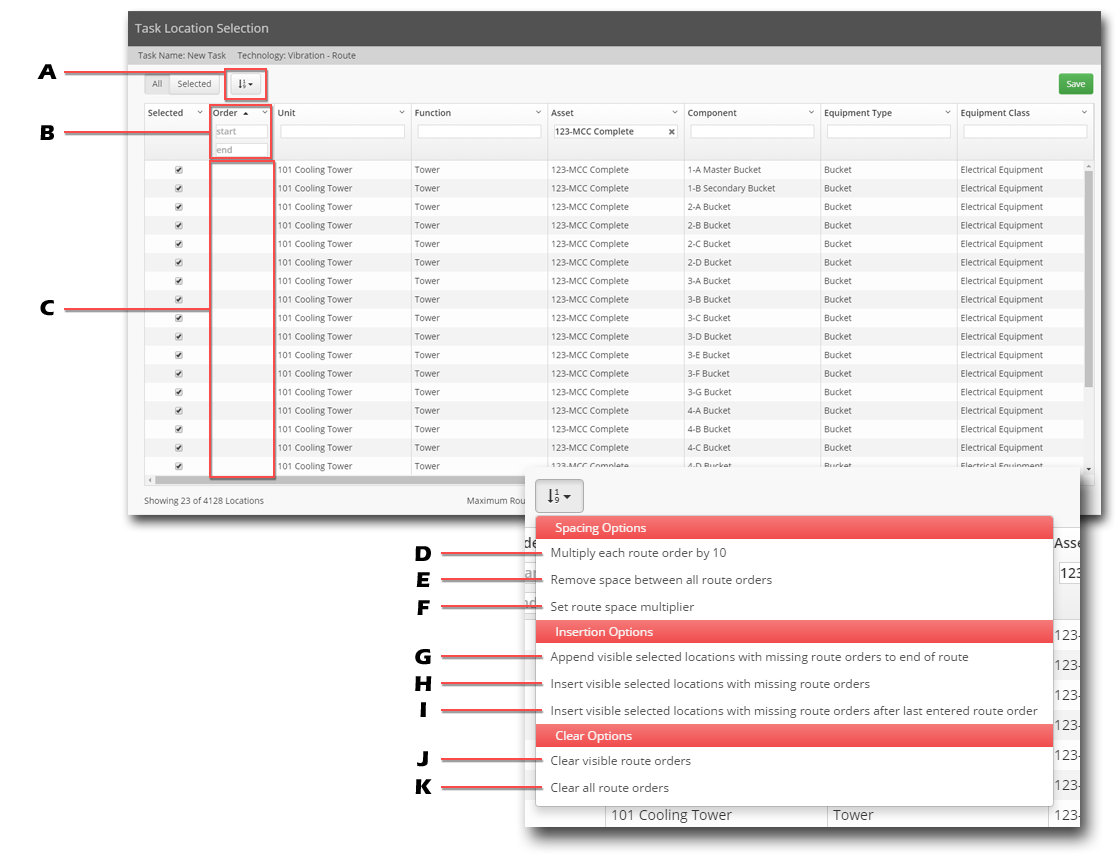
- A: Order Add/Remove Options Drop Down: Click to view all the options for adding and removing order numbers and to set the multiplier.
- B: Order Number Filter and Sorter: Sort by clicking the "Order" header, filter by typing in the numbers range to search by.
- C: Order Number Display and Manual Insert Column: This column will display the order numbers and allow user to add a order number manually.
- D: Multiple each route order by 10: Automatically changes the route order by multipling the order number by 10. (eg. If the number is 25 it becomes 250)
Adding available space between the route numbers is a good idea if more points are going to be added to the task at a later time, elimates having to re-order the entire route for one addition.
- E: Remove spaces between all route orders: Removes all open spaces between the current route order. (eg. 1,3,4 becomes 1,2,3 or 10,20,30 becomes 1,2,3.)
- F: Set route space multiplier: Set the number of spaces between points if the user set the order with the automatic settings.
- G: Append visible selected locations with missing route orders to end of route: Automatically adds order numbers to any checked and visible (filtered) location from the highest (last) number in the current route. (Uses Multiplied Value)
- H: Insert visible selected location with missing route order: Automatically adds order numbers to any checked location without an order; using a specified number. (Uses Multiplied Value)
- I: Insert visible selected location with missing route order after last entered route order: Automatically adds order numbers to any checked locations without an order; using the last manually entered order number. (Uses Multiplied Value)
- J: Clear visible route order: Removes all route order numbers of visible (filtered) points.
- K: Clear all route orders: Removes all route order numbers, both visible (filtered) and invisible (hidden by filter) points.
3)
Create the Assignment.
4) Under the Open Assignment Tab on the Control Panel, there will be a Mobile

indicator to show that the
assignment is ready to use from Roundslogging.
5) The user must login to Roundslogging and the assignment can be seen in the task list. Select the assignment, make the assessments, complete the assignment.
6) If there are any measurements that require a condition entry or comment, the user will need to log back into Tango™ and open the "Condition Assessment Task Control Panel".
From the open assignment page, open the assignment by clicking the Enter/Edit Assignment Data from the drop down menu next to the assignment. If all points have been measured, and the "To Do"
filter is on, only the points that require further action will be present. The points that require action will have a status of "
Field Info" in Red.
Click the drop down menu button, and click Assess.
7) Complete the condition entry. Once all points have been assessed, a prompt to close the assignment will be displayed. Click "OK" to complete the assignment.
Using QR Codes to Assess Assignment Points
By scanning a QR code, users can make assessments from a location. The assessments are made using Tango™ Mobile. To make an assessment, two things must happen.
1) The QR code must be assigned to the location or equipment that is needed to make the assessment.
How do I assign a code code?
If the QR is assigned to a piece of equipment, the user must navigate to the location before making an assessment.
2) The assignment must be opened to take assessments.
Making an assessment from Tango™ Mobile by Scanning a QR Code
1) Scan the QR code that is assigned to a location.
2) Login to Tango™ Mobile using the "Login" button at the bottom of the screen.
3) Scroll down to the Condition Assessment Assignments section and click "Assess"
If the point is on two or more assignments, the user will be asked which assignment the assessment should be added to.
4) Click the assessment state required for the assessment.
5) If the assessment requires a condition entry or comment, the user will be asked which condition entry mode is needed to complete the condition entry or comment.
- Full Condition Entry: A full condition entry will allow the user to entry all the condition entry information. This will complete the condition entry and the assessment.
- Intermediate Condition Entry: Intermediate will allow the user to only enter a comment, and the condition entry must be completed from the Condition Task Control Panel in Tango™.
6) Complete the condition entry (if required).
The assessment will then be visible from the open assignment.