RoundsLogging Manual
Important Information
RoundsLogging has been designed to work both Online and Offline. However, there are restrictions to Offline Uses.
While Online:
- Routes can be downloaded to the Wireless Device. After a Route has been downloaded, that Route restricts any other users from accessing that route.
- Route Points will be saved to the server once "Save" has been clicked.
- "End Route" will save and upload the Route back to the server, allowing other users to select that Route.
While Offline:
- Routes can not be downloaded.
- Only one route can be opened during Offline Status.
- User must have the Route opened before going Offline or the user will not be able to access the Route.
- Measurements can be added, but not saved to the server.
- Route Points will be saved to the Device's "Cache" until the Device is back Online. Once a connection is found by the Device, the "Stored Data" will be automatically uploaded.
- User can not navigate away from the browser or all information will be lost.

Users will be given two pop up warning messages that all data saved to the device will be lost before leaving the Route Measurement Entry pages.
Building a Route:
In the Tango Webservices, you can now add a route from any level of the tree.
Click the
Menu Options next to the desired level.
By choosing a unit level, the route editor will only allow users to select points under that unit. Choosing a function level will only allow users to select points under that function. This will reduce load times and make it easier to filter out unwanted points.
Select
Process Parameter Routes from the drop down menu.
Click
Add Route.
Fill out the form and Click
Save.
Locate the route from the route list and click the Edit Button

.
The Route Editor page will be displayed where users can edit the route information or edit the location points.
Click
Edit Locations to add points to the route.
Check each box of the Location which should be included on the route and fill out the order of the location.
When filling out the route order, input must be a numerical value. Also, users may want to use
10, 20, 30 instead of
1, 2, 3 so that future points can be added without reordering the list.
Add any special instructions that should be known, while the route inspection is in progress, in the instruction column.
Click
Save.
Logging Into RoundsLogging
Click the Roundslogging Customer Login button above.
1.) Enter User Name and Password (this will be the same username and password as your Tango™ Account)
2.) Touch "
Login"
3.) Select the Database associated with the Route
Route Quick Search
On the Available Routes List, a user can filter the results with the "Route Filter".
To filter the results, touch in the text box and type a keyword to search. Routes that match the keywords with automatically populate below. To clear the filter, remove the text in the filter text box.
When route are assigned to the user, a user filter will automatically be applied to the route list. To remove the filter, tap/click the "X" in the blue box at the top of the page. To filter again by the user, click the
"Current User:" filter box at the bottom of the list or tap/click the user name box in the "Assigned To" column.
Downloading Route
Once the user has logged in and selected the database
(described above), a list of available routes are will be displayed.
To download a route, tap/click the desired Route. The Route will open, starting with the first Route Point.
Note: Once a user has downloaded and open the Route, they must keep that Route open before going Offline to be able to enter measurements.
Entering Measurements
Once a Route has been downloaded and opened, other users will not be able to see or change Route information.
The route will begin at the first point of the route according to the route order. However, there are multiple options on the screen:
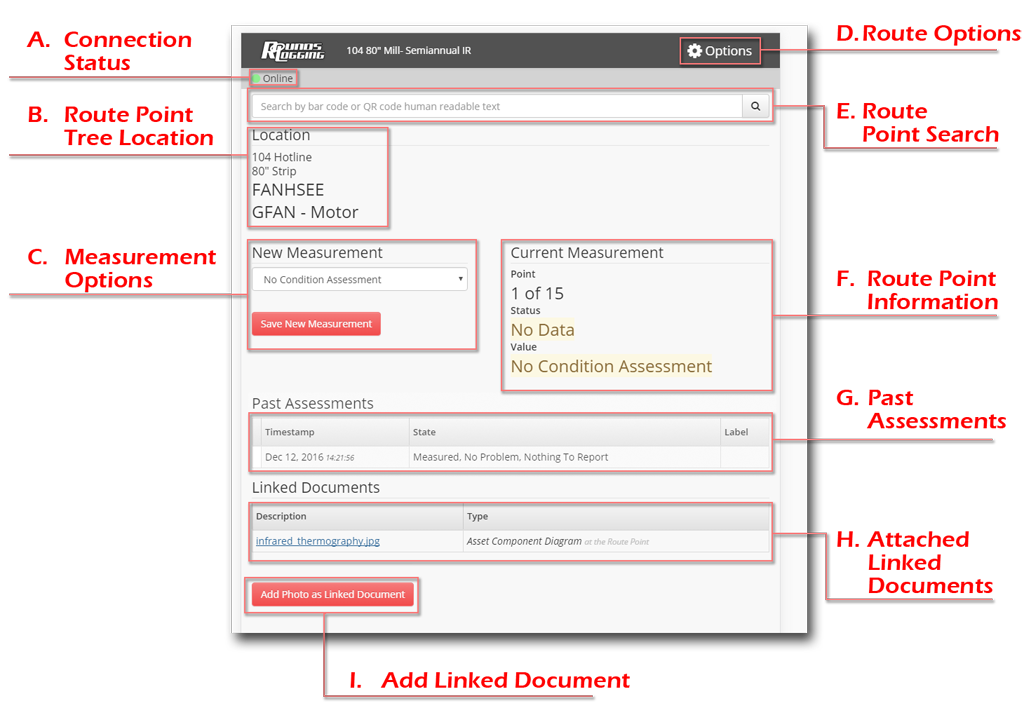
- A: Connection Status - Show the status of the users mobile connection, "Online" (Uploads instantly) or "Offline" (Uploads at a later time when connected).
- B: Location Information - Shows the tree locations of the point.
- C: Measurement Options - Where the measurements or assessment information is add, see more.
- D: Route Options - Allows the user to see the Route List, see more.
- E: Route Point Search - Allows users to search for barcode alias or QR Code value.
- F: Route Point Information - Indicates what point the user is on and the current status of that point.
- G: Past Assessments - Shows the history of this point's measurement.
- H: Linked Documents - Shows any linked documents that are associated with this location
- I: Add Linked Documents - Provides the ability for a user to add linked documents, such as; Photos from the devices camera, documents, or results.
To start taking measurements, please note that there are two types of routes Process Parameter Routes and Condition Assessment Routes. The follow section will contain process parameter route information.
Click here to see Condition Assessment Route collection information.
Process Parameter Routes
1.) There are 3 inputs types that may be available to the user:
- A: Drop Down List - For a drop down list, tap the drop down arrow, and select the desired option, type in any desired comments, and then tap "Save".
- B: Text Input Value - For a text field, touch inside the text box and enter the value, tap inside the comment section and add any desired comments, and then tap "Save".
- C: Not Measured Options - If the point is not able to be assessed, users may have a "Not Measured" option.
1.) Click/Tap the "Not Measured" button.
2.) Select a reason using the drop down menu.
3.) Fill in the label to give details about the reason the location is not measured.
4.) Click the appropiate option to save:
A.) Asset: Selecting this option applies the "Not Measured" measurement to all the route point locations under that asset.
B.) Component: Selecting this option applies the "Not Measured" measurement to all the route point locations under that component.
C.) Point: Selecting this option applies the "Not Measured" measurement to just this route point.
The database must be configured to have this option, please request to your Tango™ Administrator to contact us to have this option turned on.
2.) Click "
Save". After touching save, RoundsLogging either:
- Automatically move to the next Route Point.
- A Condition Entry Request Screen will be displayed if the measurements are outside of the set limits, after a Condition Entry Request is saved, the next Route Point will be displayed.
3.) Repeat steps 1 and 2 until all Points are measured.
4.) Users can browse through the points manually by touching the "Navigation Buttons" or "Option" button at the bottom.
5.) Once all points are correctly entered, users can review the status of each point in the Route by touching "Options" at the bottom of the screen, this will load the Route List.
Condition Entry Request
If a Route Measurement is entered and saved that is not within the set limits, a Condition Entry Screen will be displayed.
Enter a reference number and a comment into the appropriate fields and touch "
Save".
Once a Condition Entry Request is saved, the next Route Point will display. However, the "Request" is a call to action for a manager or planner to create a
condition entry from the Process Parameter Collected Data section in Tango™.
Move to the Completing Condition Entry Requests for Tasks section.
Route Point List and Ending a Route
The Route Point List will show the Order number, Status (measured or not measured), Route Item/Location, Bar Code (if available), and previous value information.
Points highlighted in Green are measured, yellow highlight indicates the next point requiring measurement, and no highlights still requires measurements or is not able to be measured.
Touchable Options for the Route List:
- A: Route Filter Indicator and Removal - Indicates when the route is filtered, click/tap the "X" to remove the filter.
- B: Order Number Point Selection - Touching the order number beside a Route Point will display that point and allow users to take measurements.
- C: Actions Drop Down - Click/Tap the actions drop down button to see other available options for the route.
- D: View Routes - This will take the user back to the Route Selection List. *
Any data taken will be lost if the user navigates away from the route.
- E: Cancel Route - This will cancel the route and remove any of the values that have been saved. *
To be sure the route is cancelled and another user will be able to open the route, make sure the device is Online when cancelling.
- F: Use Previous Value - Sets any of the checked check boxes (J) to the previously measurement or status.
- G: Complete Route - This will complete the route, even if not all measurements are taken. *
Users will not be able to open that route again to make changes once they have closed the route. The data will not be uploaded to Tango™ until the device has an internet connection.
- H: Log out - Logs the user out of Roundslogging. *
- I: Location Route Filter - Clicking on any of the four location links will filter the route list by that location. Click/Tap the "X" in the " A - Route Filter Indicator" to remove the filter.
- J: Checkboxes and Assignment Previous Values Option - By Checking the checkboxes, users can apply all previous values to those points using the "Use Previous Value" under the actions button.
In order to assign previous values, the "Allow Previous Values" must be yes.
* Must have an internet connection to complete this option.
Completing the Condition Entry Requests
For Process Parameter Task:
If a point is measured and is out of the acceptable range, it will require a condition request to be submitted.
Condition Entry Request Section
Complete the condition entry request, then complete the route. Once the route is complete, the user will need to login to Tango™ to finish creating the Condition Entry.
1) Click "Services"
2) Click "Process Parameters"
3) Click "Collected Data"
4) Select the "Task Name" in the drop down list on the main window, or find the task with the other search options on this screen.
If the task is still opened, a search will display the Task, but users will not be able to open the report until the Task has been completed.
5) Click "Search"
Click the "Report Icon" to bring up the "Process Parameter Route Info" page.
Any point that needs a condition entry will have a "Add Entry" button in the row. Click the "Add Entry" button and a Condition Entry Editor will load in the main window.
Fill out the condition entry details and click "Save".
The "Process Parameter Route Info" will be reloaded, the "Add Entry" will now be a "View" button, users can click this button to view the condition entry.
Complete any other Condition Entries to complete the Task.
For Condition Assessment Assignment Condition Entries:
Click Here
Setting Up a Condition Assessment Assignment Route
To learn how to setup a Condition Assessment Assignment Route, please visit the
Condition Assessment Assignment Manual.
Condition Assessment Assignment Route
Condition Assessment Assignment Routes can also be ran from Roundslogging.
Running an assignment from Roundslogging is the same as running a normal task. However, the difference is that only the states are available to assign as a measurement value.
If the value requires more information, (eg. "Measured, Condition Entry" or "Measured, No Problem, Add Condition Comment") the user needs to enter their comments.
If there are any measurements that require a condition entry or comment, the user will need to log back into Tango™ and open the "Condition Assessment Task Control Panel".
From the open assignment tab, open the assignment by clicking the Enter/Edit Assignment Data from the drop down menu next to the assignment. If all points have been measured, and the "To Do"
filter is on, only the points that require further action will be present. The points that require action will have a status of "
Field Info" in Red.
Click the drop down menu button, and click Assess.
Complete the condition entry. Once all points have been assessed, a prompt to close the assignment will be displayed. Click "OK" to complete the assignment.
Add a Linked Document to a Route Point
1) On any of the Route Point screens, click/tap the "Add Photo as Linked Document".
2) Select the photo/image you wish to add, click/tap "Open" or "Add".
3) Change any other the settings in the "New Linked Document" window.
A)
Description - The name that will appear as the link to access the linked document.
B)
Linked Document Type - Select what type of document it is.
C)
Folder - Where the image/photo will be saved.
D)
Destination - Sets what the linked document will be connected to. Route Point will only show up on the route,
Asset Component will be attached to the Component Loction, and the Asset will be attached to the Asset Level.
4) Click "Add". Users will see the linked document in the "Linked Document" section of the route point screen.